How-To Articles

How-To Articles - Learning

Category: Learning

How To Set A Social Share Image for a Page

How To Set A Social Share Image for a Page

Posted By Alesha Wireman
May 01, 2020 Category: Learning, Modules, How To

One of the newest features found within your Virteom powered website is the ability for you to add a social share image to any and every site page. This means that when any page of your website is shared on a social media platform, the image that accompanies the post is one that you choose. Social share images play a large role in the number of engagements your posts or others' posts linking to your website receive. It can impact a viewer's decision to click the post, view the page to find out more, and can ultimately result in new business for you.   This new feature is important for several reasons. You now have the ability to control the social share image for every page of your website to ensure that it's the best reflection of your company and the content overall. You can set the image so that it follows your brand guidelines and captures your audience's attention, making them want to visit the website page every time! Updating the social share image is the simplest way to guarantee that your website, blog posts, and site pages present beautifully on any social media platform across the board. How to set a social share image Login To Your Site To make edits to your website, you'll need to log-in first:  Login to the back-end of your website by visiting (your URL.com)/virteom Enter your username Enter your password Click 'Login' Navigate to the Page you're Setting A Social

How to Add, Edit and Delete Photos Using the Masonry Module

How to Add, Edit and Delete Photos Using the Masonry Module

Posted By Olivia Justice
March 23, 2020 Category: Learning, Modules

Is your Virteom powered website utilizing the Masonry Photo Module? Adding new photos to your gallery is really simple and even allows you to upload multiple images at one time. The one real advantage of using the masonry module is so that you can display images in groupings or categories on a singular webpage. This allows you to separate images out into different galleries so like photos can appear together. For example: Say you're a landscaper and you have a webpage entitled "Hardscapes". You may want to output multiple galleries on this single page to break out each type of hardscape you've done: walkways, patios, pergolas, steps, fire pits, etc. The masonry photo module allows you to accomplish this. You can set multiple categories, and multiple galleries in that one category - all to output on one single webpage. In this how-to article, we explain how to add a new category, add a new gallery, edit an existing category, edit an existing gallery (adding images to an existing gallery), and how to delete categories, galleries, and images in the Masonry Photos module powered by RocketSites. Logging-In First things first, you must log-in to your Virteom powered website. You can do this by visiting your website and adding /virteom at the end. This will take you to the log-in screen for the site. Enter your email address in the email field Enter your password in the password field Click 'Login' Navigate to the Masonry Grid

How to Add, Edit and Delete Photo Galleries Using PhotoGrid

How to Add, Edit and Delete Photo Galleries Using PhotoGrid

Posted By Olivia Justice
July 24, 2019 Category: Learning, Modules

How to Add, Edit and Delete Photos in the PhotoGrid Module Does your Virteom powered website have a photo gallery on it? Adding new photos to your gallery is really simple and even allows you to upload multiple images at one time. In this how-to article, we explain how to add new photos to the gallery, remove photos from a gallery, add captions and delete your photo gallery. Logging-In First things first, you must log-in to your Virteom powered website. You can do this by visiting your website and adding /virteom at the end. This will take you to the log-in screen for the site. Enter your email address in the email field Enter your password in the password field Click 'Login' Navigate to the PhotoGrid Module Once you're logged-in you click 'Dashboard' from the top gray editor menu. After clicking 'Dashboard' use the left sidebar menu to navigate over to 'Modules'. The module that handles gallery images is called 'PhotoGrid.' Find PhotoGrid in the menu and click it. Now that you are in the PhotoGrid module, you'll see an inventory list of all the PhotoGrids on your website. The inventory page allows you to add a new gallery, edit an existing gallery or delete one altogether. Adding a New Gallery To add a new gallery to the website, click 'Add New' from the PhotoGrid inventory page (image above). Once you click 'Add New' a new page will populate. Note: You may need to enable Adobe Flash to

How to Edit Your Website Footer

How to Edit Your Website Footer

Posted By Olivia Justice
May 07, 2019 Category: Modules, Learning, How To

The purpose of a website footer is to help visitors by adding information and navigation options at the bottom of the webpage. More often than not, the footer of your website doesn't change, and it really shouldn't...like ever, because it's giving end-users links to service pages and contact information. But in the case you get a new phone number or address, the need to change your footer comes all the more important because again, this information appears on every single page of your website. You don't want the wrong contact information everywhere!  So , what do you do if you need to update the footer on your RocketSite? Have no fear! With RocketSites, it's really easy to go in and make edits to the footer of your website all on your own.  Follow along this how-to guide to learn how to update the footer of your website in RocketSites. how to edit the footer on rocketsites Login To Your Site To make edits to your website's, you'll need to log-in first:  Login to the back-end of your website by visiting (your URL.com)/virteom Enter your username Enter your password Click 'Login'   Navigate to the footer module Once you're logged-in:  Click on 'Dashboard' from the top gray menu After clicking 'Dashboard' you should see a new set of menu items. Click on 'Modules' from the left sidebar menu Select 'Footer' from your list of modules  Please note: every site

How To Enable/Disable Products in Virteom CMS

How To Enable/Disable Products in Virteom CMS

Posted By Olivia Justice
January 21, 2019 Category: Learning, ECommerce

Do you have a product that is not currently for sale in your Virteom shopping cart? Maybe you have products that are only available during the holiday season or during a specific month. We know how time consuming it can be to have to reupload products, so instead of deleting your product, you can simply disable your products for as long as you want. Enabling it again when it becomes available. So, how do you enable or disable a product in Virteom CMS? Keep reading to find out.... How to enable/disable a product First, you'll need to sign into the back-end of your website by visiting yourdomain.com/virteom -- just tag /virteom at the end. Visit (insertyourdomain).com/virteom Enter your email Enter your password Click 'Login' Navigate to Products Once you've logged in, click on 'Manager' from the top-editor. From the left-hand menu, select 'Store' Once you're in the store, select 'Products' from the left-hand menu Locate the item you would like to make available or disable. Click 'Edit' next to that inventory item. Once your in your product, scroll down until you locate the 'Product Enabled' checkbox. If you would like to disable this product, uncheck the box. If you would like to enable this product, make sure the box is checked. Once you've enabled or disabled your product hit 'Save' at the bottom of the screen. Wah-lah! You now have either enabled a product that

Controlling User Access

Controlling User Access

Posted By Virteom
October 05, 2017 Category: User Access, Learning

With Virteom, website administrators can choose which members have access to certain areas on the site. For example, you would want your blogger to have access to create and edit blog pages. You can make different levels of users, from customers and staff, to full admins. Let's get started. After logging in as an admin, select Dashboard (or Manager) from the top bar. Then, on the left hand side, select Members. This will bring up a screen showing all of the members who are registered to your site. You can also search for a member's name using the Search field. Click on Edit next to a member's name. Here is the user access part of the next screen. You can edit contact information, change a user's password, and update user access from this area. Editing Access and Permissions Box 1 is a list of all of the administration features a user has access to. In this example, this user has access to all features. Explore the list on your site and determine how you wish to set up access. Box 2 is a list of all of the web pages on your site. Again this user has access to edit all of the pages using the Editor section of the Virteom toolbar. In this way, you can select who has permission to edit certain pages of your site. If no pages are selected, the option to bring up the editor will not show. If you have any locked private pages on your site, you can quickly set up certain presets with the Member Types section under Members on the left hand menu. This will allow y

Improving your SEO in Virteom CMS

Improving your SEO in Virteom CMS

Posted By Olivia Justice
September 29, 2017 Category: Search Engine Optimization, How To, Learning

SEO in Virteom CMS Search engine optimization (SEO) is an important piece to your website. Generating traffic from organic searches to your website is a key part of your online business. The time and effort you put towards your websites SEO can mean all the difference. That's why adding things like browser titles, meta descriptions and meta tags for every page on your site is important. Adding these behind the scenes SEO tactics, you can improve your search appearance. In Virteom CMS, we make it easy to add things like meta description, meta tags and browser titles in. Follow along with this how to learn how to add this SEO information on all the pages of your website. First things first, you'll need to log-in to the back end of your website. Once you have logged in, you should see a black navigation bar at the top of your screen. Click on 'Navigation' from the black taskbar at the top of your screen Click on the 'Edit' icon that is next to the page name you'd like to add SEO information to Adding a Browser title in Once you navigate to the page you'd like to edit the browser title, meta description or meta keywords for - you'll need to go in edit mode. 1. In the top taskbar, click on 'Editor' As you can see (below), in the tab on my browser it is displaying the website's URL instead of saying the name of the page "Website Design | Virteom" To edit your browser title: 2. Click on the black sid

Embedding a YouTube Video

Embedding a YouTube Video

Posted By Mike Harries
July 20, 2017 Category: Learning, Content

Do you have a marketing video you'd like to add to your Virteom powered website? No worries, it's a breeze to add new videos to any content region on your website. This how-to guide takes you through how to add a YouTube or Vimeo video to your Virteom Powered website. Keep reading to learn how to embed a video on your website: how to embed a video on rocketsites Login To Your Site To make edits to your website's, you'll need to log-in first:  Login to the back-end of your website by visiting (your URL.com)/virteom Enter your username Enter your password Click 'Login' Navigate to the page you'd like to embed a video on Once you log in, click on 'Site Pages' or 'Navigation' from the menu. Navigate to the page you would like to embed a Youtube or Vimeo video to. (Via 'Site Pages' in the top toolbar or through your navigation) Click 'Editor' from the top of your toolbar Click the content area in which you would like to add the YouTube video to. After clicking into the content region you'd like to embed a video to, click 'Source' from the toolbar (it will show you the HTML version of your content) Edit Source Mode Once you're in the Source (1), you'll see your content formatted as HTML -- Find where within your content you'd like your video to embed, and Paste the EXACT embed code from YouTube or Vimeo (2). It is extremely important to get the full

How to Add Page Banners

How to Add Page Banners

Posted By Olivia Justice
November 21, 2016 Category: Page Banner, Modules, Virteom CMS, Learning

How to add a page banner in Virteom CMS   Maybe you have been asking yourself "How do I add a page banner in Virteom CMS". Well, look no further! In this article you will learn how to add a page banner in our custom CMS. Follow along with our step by step guide, showing you how to add page banners. First things first: Log In Go to yourwebsite.com/virteom and use your credentials to login. Zoom Navigating to the Page Banner module Once you are logged in, you'll want to click on 'Manager' to get into the behind the scenes editor. Click on Manager. Zoom Navigating > Modules Once you're in the back-end editor, you'll want to click on Modules in the left hand navigation. Zoom Modules > Page Banners Once you're in the Modules section, you'll be able to see all the modules installed on your website. In this case Zoom Adding a New Page Banner Once you're inside the Page Banner module in the Virteom CMS, you'll want to click 'Add New' page banner Zoom New Page Banner Once you've clicked add new page banner: Label: This is for internal reference only. The label will appear on the external page of the Page Banner module, so you'll know which one you're editing later. Overlay Text: This is where you will type text that will overlay the image you upload for the page banner Page to Display Image On: From the dropdown, choose which

How to add an Employee to the Employees Module

How to add an Employee to the Employees Module

Posted By Olivia Justice
November 21, 2016 Category: Learning, Employees, Modules, Virteom CMS

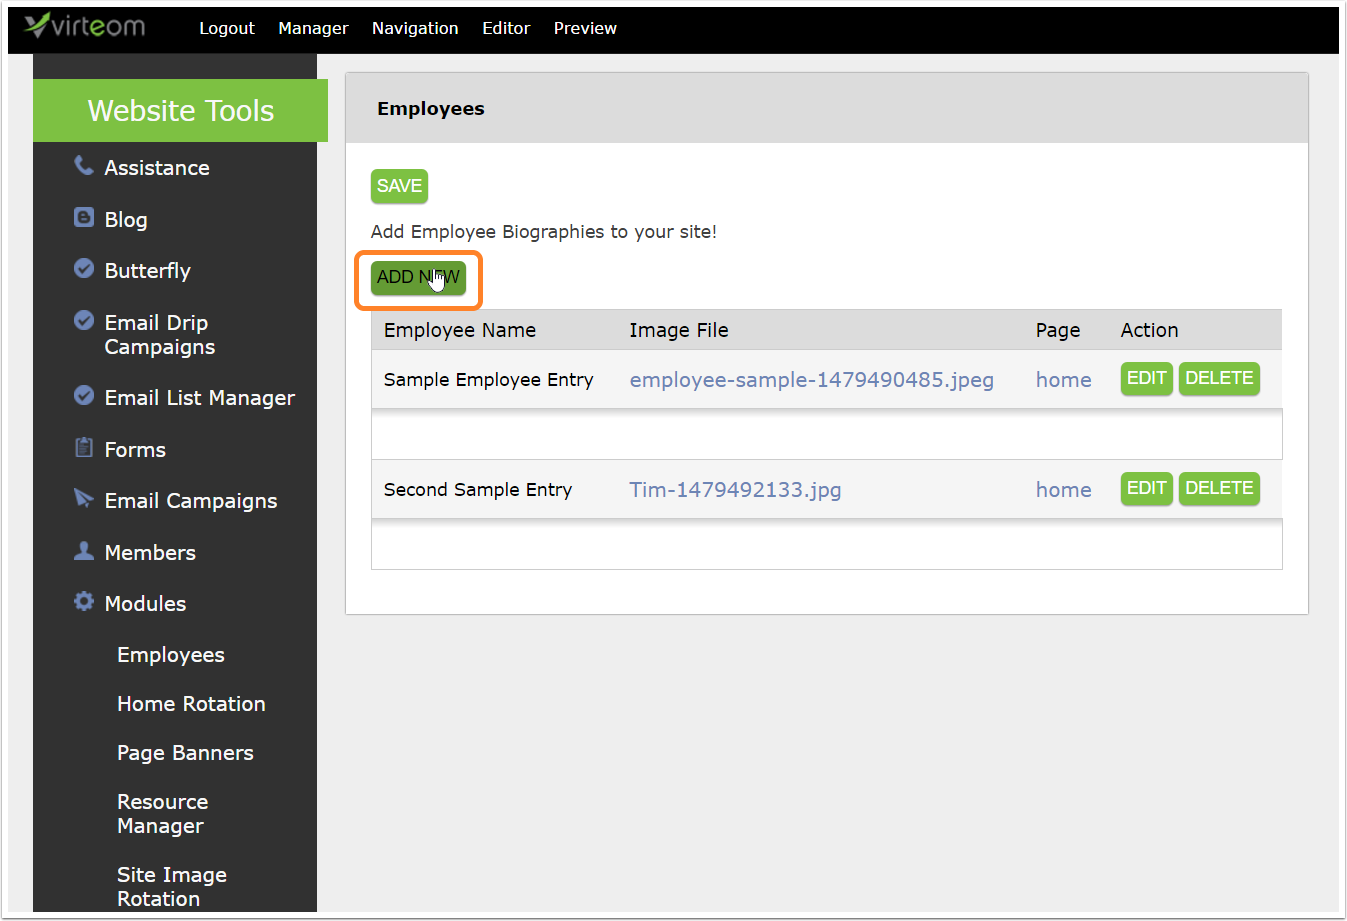
How to add an employee to the Employees Module in Virteom CMS So, you've been wondering "How do I add a team member or an employee to my Virteom powered website?" or "How do I add an employee to the employees module in Virteom?" Well, you've come to the right place. In this article you will learn how to do just that. Follow along with this instructional guide and learn how to add employees to your team's page. As always, if you have any questions - feel free to reach out to a Virteom team member by utilizing our ticket system. Login to the Virteom CMS First and foremost, we'll need you to login to editor side of your website. To access the Virteom CMS, type in yourcompanyurl.com/virteom - Once you're here, you'll use your login credientails. Navigating to the Modules Once you've logged in, click on 'Manager' from the top Navigation. Zoom Navigation > Modules In the right hand Navigation, you'll click on Modules. Once you have accessed the (1) Modules page, you'll see a list of all the modules that are installed on your website. (2) Since we're focusing in on the employees module, we'll click on that one. Zoom Adding a New Employee Now that you're in the Employees module, you can add in a new employee. Click the 'Add New' button. Zoom Entering Information About the New Employee A new screen will appear once you click on the 'New Emp

How To Add Meta Data To Your Page

How To Add Meta Data To Your Page

Posted By Alana Haws
March 30, 2016 Category: Meta Data, Meta Descriptions, Virteom CMS, Learning

This post will teach your how to use the Virteom CMS to add "Meta Data" to your page. Meta Data includes Meta Descriptions and Meta Keywords. One great thing about the Virteom CMS is that adding Meta Data to your page within the CMS is extremely easy and user-friendly. Some CMS' require you to be a rocket scientist to figure out how to add your meta data...making you download third-party plugins and whatnot....with the Virteom CMS it's all built in, right on the page - super simple for even the novice content manager! Meta Description: This is an HTML and XHTML element that describes your page to search engines. This attribute  plays a significant role in SEO rankings. Learn More About Meta Descriptions! Meta Keywords: These are a specific type of meta tag that appear in the HTML code of a Web page and help tell search engines what the topic of the page is. Use 10-20 words to describe your page. Learn More About Meta Keywords! Login to the CMS and navigate to the page you'd like to update Click on "Editor" Click on "Editor" to open the CMS Editor Pull out the left hand side with the left "Tab" Click on the tab shown in the orange box Click on "Meta Data" Type Out your Meta Description and add your MetA Keywords Make sure to click "SAVE" "SAVE" is located UNDERNEATH the Meta Data boxes. Be sure not to confuse this with the "SAVE PAGE" button - which saves t

Adding a Photo Gallery to your Website

Adding a Photo Gallery to your Website

Posted By Dan Carbone
May 08, 2015 Category: Learning, PhotoGallery

Step 1: Create the Gallery Page First create the gallery page. You may want to start off by staging it in the Hidden section of the Virteom Platform. Click the plus sign next to the 'Hidden' menu node. You can always move the page later by dragging it around. Give the Page a Name Give the page a name Select "Photo Gallery" off the page layout option Then click save   Now Add Images to that Gallery Page Click on "Manager" on the top toolbar Click on "Modules" on the left toolbar Click on "Photo Galleries" under the modules section Add New Image At the top click "Add New" to add a new image Fill out a Label. This will become the alt tag. Select the page(s) that the image should show up on. This will only work if the page has a layout of Gallery from the previous step. The benefit here is you could allow an image to show up on multiple gallery pages if you wanted to. Browse for the large image. This would be the large image that appears if they click on the thumbnail. Once you have that selected make sure to click 'Upload Now' See next screen for next steps in the process... Add New Image Part 2 Continuing down the screen in adding images. Add a thumbnail to the second browse area. This is the smaller image that appears. You can give the photo a description or leave it blank. Then click save. Now repeat this process of adding images until all the images are in the

Creating an Ad Landing Page in Virteom with Conversion Tracking

Creating an Ad Landing Page in Virteom with Conversion Tracking

Posted By Dan Carbone
February 12, 2015 Category: Learning

If you want to create a Ad landing page in Virteom that can be used to track Google Conversion, Bing Conversions or any other ad conversion, follow these instructions. 1. Login to your Virteom Platform Click on Navigation Click on "Navigation" at the top to add your landing page to the site. Put your Landing Page in the "Hidden" Section 1. Put your landing page int he "Hidden" section of your website. 2. Click the "Plus" sign next to the hidden menu to add a new page to that section. A Page Creation Dialogue Box Appears Once you click the "Plus" button a box will appear. Select that it will be "Content" Give you page a name Select the template layout type. If you've hired Virteom to create landing page templates for your site you will see them in the list below. Select the landing page template you want to use Check of the checkbox that you want to instantly edit the page after you hit "Save" Then "Save" the page. Edit your Landing Page Edit your landing page Click on "Save Page" in the upper left toolbar Click on "Navigation" to add the "Thank You" landing page.   Add Thank You Landing Page Just ad you did with the landing page creation, add a "Thank You" landing page in the hidden section as well. Add Content to the Thank You Landing Page Now add the content to your thank you page and click on the "Save P

Adding an Image to a Web Page in Virteom

Adding an Image to a Web Page in Virteom

Posted By Dan Carbone
November 04, 2014 Category: Learning

This article will explain how to upload an image into your Virteom powered website. Login First login to your website. You should see the Virteom administration toolbar at the top. Then click on the page in your site you want to add the image to. Make Page Editable Make the page editable by: 1. Clicking on the "Editor" option on the top toolbar. 2. You should see an editable zone, this will have a dotted outline around it. In here you can add text and images to your website. Focus your Cursor Place your cursor inside the editable zone where you want the image to appear. Click on Add Image Icon Click on the add image icon. It will look like a little photo of a house and it's next to the flag icon. This will open a new window. Image Properties Box After you click the icon this image properties box will show up. Now you need to browse for the image that you want to place on the page. Click the "Browse Server" button to browse for an image. File Browser Once you click "Browse Server" the Image File Browser will appear. In here you can either select an image that you previously uploaded or you can upload one from your computer to the site. We are going to show you how to upload one from your computer. Click "Upload File". Upload a File After you click "Upload File" a new box will appear. This is the file uploader box. To browse for a file on your computer click the

Viewing Your Daily Click Paths in Virteom

Viewing Your Daily Click Paths in Virteom

Posted By Dan Carbone
November 03, 2014 Category: Learning, Statistics

This article shows you how to view the daily clicks of the users on the website. You can also access other statistics from the statistics window. Login to Virteom 1. Login to Virteom by going to your website and then typing /virteom after the domain name. For example if your website as example.com, to log into virteom you would type example.com/virteom in the browser window. 2. Then type in your username and password. 3. Click "Login" Click on Statistics Click on "Manager" at the top and then click on "Statistics" on the side menu. Click on Daily Leads Click on "Daily Leads" on the side menu to view the daily clicks of that have taken place that day.  To view other statistical data click on the other reports on the side

Managing Related Page Links on a Virteom Site

Managing Related Page Links on a Virteom Site

Posted By Dan Carbone
October 23, 2014 Category: Learning

How do you manage a menu system in your website that has related hyperlinks to different pages on your website per page? It's a bit harder than just having a menu that is the same on every page in the site. You have to be a bit more inventive in the approach.  Virteom has a module that allows you to select certain hyperlinks that would show up in a menu based on the content on the page you are currently viewing. Let's walk you through that module and how you can use it to manage related content. We'll use Magnet's website to demonstrate the example.   Looking at the Side Menu If we look at the side menu we can see it has 5 hyperlinks that go to 5 different pages. The owner of the website wants the flexibility that these would be different per page. On the next slide we'll show you the backend and how you can simply manage this sitewide. Log Into Virteom To manage those links on that side menu globally simply log into your Virteom and click on the 'Manager" button on the top menu. Open the Modules section of your Virteom On the side menu click on "Modules" Open the "Sidebar Menu" Module Managing the "Sidebar Menu" Inventory In the "Sidebar Menu" module you will see an inventory of links. In this example they match the links on the page we showed you.  You can add a new link by clicking "Add New" or you can edit a link that is already

Placing Google Conversion Code in Virteom

Placing Google Conversion Code in Virteom

Posted By Dan Carbone
July 25, 2014 Category: GoogleConversions, Learning

  Log Into Google Adwords at https://adwords.google.com Click on "Tools" on the top menu Assuming you already have your Ad Groups created and your Ads in that group created along with your conversions you would simply click on the "Tools" option on the top menu. Click on "Conversions" Select your Conversion You may have many conversions in this list. Select the one you want to use. In our sample we only have one. Get the Code Conversion Tracking 1. Grab the "google_conversion_id" number 2. Grab the "google_converstion_label string Place that Conversion Number and Label string in this code... <div style=”display:none;”> <img height=”1” width=”1” style=”border-style:none;” alt=”” src=”//www.googleadservices. com/pagead/conversion/974561955/?value=0&amp;label= “DXUQCJX7nAkQo8Xa0AM&amp;guid=ON&amp;script=0”/> </div> Then copy the above code to place into the Virteom platform... Log into Virteom to Place the Code Log into your Virteom admin. Click on the "Forms" button to prepare code placement. Select a Form Select a form from the list of forms on your website to place the conversion code into. Click "Edit" next to the form. Click "Show More Options" Click "Google Conversions" Paste the Code and hit

Managing Email Lists in Virteom Email Campaigns

Posted By Dan Carbone
March 22, 2014 Category: Learning

Overview The video below demonstrates in depth, how you can manage your email lists for your Virteom based email campaigns. This video covers the following topics... Features Described in the Video Merging Lists - How to take one ore more email lists and merge them together. Deducting Lists - How to deduct one list from another. For example if you had a 1500 person list as potential registrants for your conference and you had 350 people registered, you could use this tool to deduct the registrants from the non registrants list in a matter of seconds rather than doing this manually. Create a List - After you've imported many members into the system it may become necessary to create new lists from the combined member population from all of the lists imported over time. This tool will allow you to do that. It will also allow you to add new customers that became your customers through the Virteom shopping cart and so on. Edit Lists - Gives you the ability to add and remove people from existing lists. Filter Lists - This feature allows you to use database filters such as first name, last name, email, company, state and zip and then use a keyword search against those filters to create custom lists. This will be useful for larger list populations in the Virteom Platform. We hope you enjoy this in depth video on how to use the list management tools for email campaigning inside of Virteom. Tutorial Video on Managing Email Campaign

How to Set Search Engine Page Ranking

How to Set Search Engine Page Ranking

Posted By Mike Harries
October 29, 2013 Category: Learning, Search Engine Optimization

In Virteom you can simply set each page to be a certain rank of importance.  Virteom will directly communicate with Google and tell Google and other search engines how important this page is to you and how often those search engines should come back and view those pages. This takes the guessing work out of the search engine and helps you drive a direct campaign with the search engines.  Below are the instructions on managing your page rankings on a Virteom powered website. Opening the page options tab Upon logging in, click Editor in the Virteom Toolbar Find the tab on the left-hand side of the screen to expand the page options tab.   Search Engine Page Ranking Click Search Engine Page Ranking to open this section. Adjust the page rank. Here are some guidelines on how to properly assign page rankings in our system. Page ranking ranges from 1.0 (highest importance) to 0.1 (least importance). You want only about 4-5 pages to rank at a 1.0. These pages should be the core aspects of your business and should include the home page as well. Most of your pages will rank from a 0.9-0.5. The Virteom website report card will scan all pages ranked from 1.0 to .05 for content length, alt tags, meta tags, and broken hyperlinks. This means you can assign incomplete pages, drafts, and hidden pages at a .01 so that they don't negatively skew your report card! The frequency setting tells search engines how often they should come back and refresh their co

Adding Product Descriptions from a Word Document

Adding Product Descriptions from a Word Document

Posted By Mike Harries
August 23, 2013 Category: Learning

Find the 'Paste from Word' button When you copy from a text editor, a lot of times it will carry hidden, embedded styles along with it. Not only will the styles differ from normal text on your website, but they will break any web-based text editor. To work around this, we have a special button to paste from Word. Using this method is the safest way to bring text from any text editing software into your product description. First, click on the clipboard icon in the Navigation Bar   Add your text in the box below Paste your content here. Click OK to continue.   And you are done! These same steps can be re-used anywhere you see the editor's toolbar, such as  editing content pages as well as blog