
How-To Articles - Modules
Category: Modules
How To Set A Social Share Image for a Page

One of the newest features found within your Virteom powered website is the ability for you to add a social share image to any and every site page. This means that when any page of your website is shared on a social media platform, the image that accompanies the post is one that you choose. Social share images play a large role in the number of engagements your posts or others' posts linking to your website receive. It can impact a viewer's decision to click the post, view the page to find out more, and can ultimately result in new business for you. This new feature is important for several reasons. You now have the ability to control the social share image for every page of your website to ensure that it's the best reflection of your company and the content overall. You can set the image so that it follows your brand guidelines and captures your audience's attention, making them want to visit the website page every time! Updating the social share image is the simplest way to guarantee that your website, blog posts, and site pages present beautifully on any social media platform across the board. How to set a social share image Login To Your Site To make edits to your website, you'll need to log-in first: Login to the back-end of your website by visiting (your URL.com)/virteom Enter your username Enter your password Click 'Login' Navigate to the Page you're Setting A Social
How to Add, Edit and Delete Photos Using the Masonry Module

Is your Virteom powered website utilizing the Masonry Photo Module? Adding new photos to your gallery is really simple and even allows you to upload multiple images at one time. The one real advantage of using the masonry module is so that you can display images in groupings or categories on a singular webpage. This allows you to separate images out into different galleries so like photos can appear together. For example: Say you're a landscaper and you have a webpage entitled "Hardscapes". You may want to output multiple galleries on this single page to break out each type of hardscape you've done: walkways, patios, pergolas, steps, fire pits, etc. The masonry photo module allows you to accomplish this. You can set multiple categories, and multiple galleries in that one category - all to output on one single webpage. In this how-to article, we explain how to add a new category, add a new gallery, edit an existing category, edit an existing gallery (adding images to an existing gallery), and how to delete categories, galleries, and images in the Masonry Photos module powered by RocketSites. Logging-In First things first, you must log-in to your Virteom powered website. You can do this by visiting your website and adding /virteom at the end. This will take you to the log-in screen for the site. Enter your email address in the email field Enter your password in the password field Click 'Login' Navigate to the Masonry Grid
How to Add, Edit and Delete Photo Galleries Using PhotoGrid

How to Add, Edit and Delete Photos in the PhotoGrid Module Does your Virteom powered website have a photo gallery on it? Adding new photos to your gallery is really simple and even allows you to upload multiple images at one time. In this how-to article, we explain how to add new photos to the gallery, remove photos from a gallery, add captions and delete your photo gallery. Logging-In First things first, you must log-in to your Virteom powered website. You can do this by visiting your website and adding /virteom at the end. This will take you to the log-in screen for the site. Enter your email address in the email field Enter your password in the password field Click 'Login' Navigate to the PhotoGrid Module Once you're logged-in you click 'Dashboard' from the top gray editor menu. After clicking 'Dashboard' use the left sidebar menu to navigate over to 'Modules'. The module that handles gallery images is called 'PhotoGrid.' Find PhotoGrid in the menu and click it. Now that you are in the PhotoGrid module, you'll see an inventory list of all the PhotoGrids on your website. The inventory page allows you to add a new gallery, edit an existing gallery or delete one altogether. Adding a New Gallery To add a new gallery to the website, click 'Add New' from the PhotoGrid inventory page (image above). Once you click 'Add New' a new page will populate. Note: You may need to enable Adobe Flash to
How to Edit Your Website Footer

The purpose of a website footer is to help visitors by adding information and navigation options at the bottom of the webpage. More often than not, the footer of your website doesn't change, and it really shouldn't...like ever, because it's giving end-users links to service pages and contact information. But in the case you get a new phone number or address, the need to change your footer comes all the more important because again, this information appears on every single page of your website. You don't want the wrong contact information everywhere! So , what do you do if you need to update the footer on your RocketSite? Have no fear! With RocketSites, it's really easy to go in and make edits to the footer of your website all on your own. Follow along this how-to guide to learn how to update the footer of your website in RocketSites. how to edit the footer on rocketsites Login To Your Site To make edits to your website's, you'll need to log-in first: Login to the back-end of your website by visiting (your URL.com)/virteom Enter your username Enter your password Click 'Login' Navigate to the footer module Once you're logged-in: Click on 'Dashboard' from the top gray menu After clicking 'Dashboard' you should see a new set of menu items. Click on 'Modules' from the left sidebar menu Select 'Footer' from your list of modules Please note: every site
How to use the Redirect Module

Changing URLs is restricted in Virteom CMS - Why? Because it can wreak havoc on your website. Changing your URL can result in: Loss of SEO Ranking Loss of referring site traffic. Have you ever been to a site linked from a blog you were reading and then get a 'Page does not exist error?' - It is likely that they changed the URL. Email Clicks go to Dead URLs & much more! To learn more about why changing URLs can devastate your SEO traffic CLICK HERE. But we understand that sometimes changing your URL is neccesarry. We suggest adding a redirect on your page. Redirection is the process of forwarding one URL to a different URL. This allows you to send users and search engines to a different URL than the one that was originally requested. Virteom CMS makes it easy for you to add a redirect on your website. Keep reading this how-to guide to get the scoop: How to add a redirect on your website First things first, you'll need to login to the back-end of your website. Type in your name and password and click login. Now that you're logged in, you'll be greeted by your homepage. In top black Navigation click on Manager Accessing Modules from the Website Tools In the left hand panel Website Tools you'll see a item listed asModules. Click on it. On the left you should see a dropdown of all the modules (or commonly known as plugins) that are installed on your website. They also display on the right hand side. 1. From the menu
How to Add, Edit and Delete Info Boxes

How to add, edit and delete Info Boxes Does your Virteom powered website use info boxes to display information about your services? Are you stuck trying to use the editor but confused why you can't change the content within the box? Well, wonder no more. This follow along article explains how you can change the photo, text, button and link that is within these infoboxes. Log-in to your Virteom Powered website Obviously enough, you need to be logged in to edit the infoboxes. So, go to yourwebsite.com/virteom. Once you're logged in, access the Manager Now that you're logged in, you'll be greeted by your homepage. In top black Navigation click on Manager Accessing Modules from the Website Tools In the left hand panel Website Tools you'll see a item listed as Modules. Click on it. On the left you should see a dropdown of all the modules (or commonly known as plugins) that are installed on your website. They also display on the right hand side. 1. From the menu select Info Boxes. Here you'll see your inventory of Info Boxes that you have on your site. Allowing you to add, edit and delete info boxes on your Virteom powered website. 2. To add a new Info Box click "Add New" at the top of the page Adding a New Info Box Everything about adding a New Info Box is pretty self explanitory. Once you get to this page you'll need to fill in the following information: 1. Title: This is 2. Rich Text Editor: this area
How to Add, Edit and Delete CTAs From Your Website

How to add, edit and delete CTAs from your Website Driving traffic to your website is great. But you can't always reap the benefits of all that traffic without adding a call to action to your page. What is a call to action? It is an image or instruction that drives the visitor to take action. Maybe it is to take them to a landing page that drives them to fill out a form, to sign up for your services or to download your whitepaper. In some cases, a call to action could just invite the user to take a look at some of the other services you have to offer. Almost every page on your website needs a call to action. It gives the page purpose while also supplying your visitor with information. So, now you're wondering - how do I add a call to action to my Virteom powered website? Well, it's easy! Follow this guideline, and we'll get you in action in no time. Log-in to Your Virteom Powered Website Obviously, you'll need to sign into the back-end of you website to add a CTA to your page: Go to: www.yourwebsite.com/virteom Now to access the Call to Action (CTA) Module Now that you're logged in, you'll be greeted with your beatiful homepage. From the black Navigation bar at the top of your screen click on Manager. Accessing Modules On the left hand side, in the Website Tools you'll want to click on Modules. This is where you'll see all the modules that are currently installed on your website. If you don't
How to Add Page Banners

How to add a page banner in Virteom CMS Maybe you have been asking yourself "How do I add a page banner in Virteom CMS". Well, look no further! In this article you will learn how to add a page banner in our custom CMS. Follow along with our step by step guide, showing you how to add page banners. First things first: Log In Go to yourwebsite.com/virteom and use your credentials to login. Zoom Navigating to the Page Banner module Once you are logged in, you'll want to click on 'Manager' to get into the behind the scenes editor. Click on Manager. Zoom Navigating > Modules Once you're in the back-end editor, you'll want to click on Modules in the left hand navigation. Zoom Modules > Page Banners Once you're in the Modules section, you'll be able to see all the modules installed on your website. In this case Zoom Adding a New Page Banner Once you're inside the Page Banner module in the Virteom CMS, you'll want to click 'Add New' page banner Zoom New Page Banner Once you've clicked add new page banner: Label: This is for internal reference only. The label will appear on the external page of the Page Banner module, so you'll know which one you're editing later. Overlay Text: This is where you will type text that will overlay the image you upload for the page banner Page to Display Image On: From the dropdown, choose which
How to add an Employee to the Employees Module
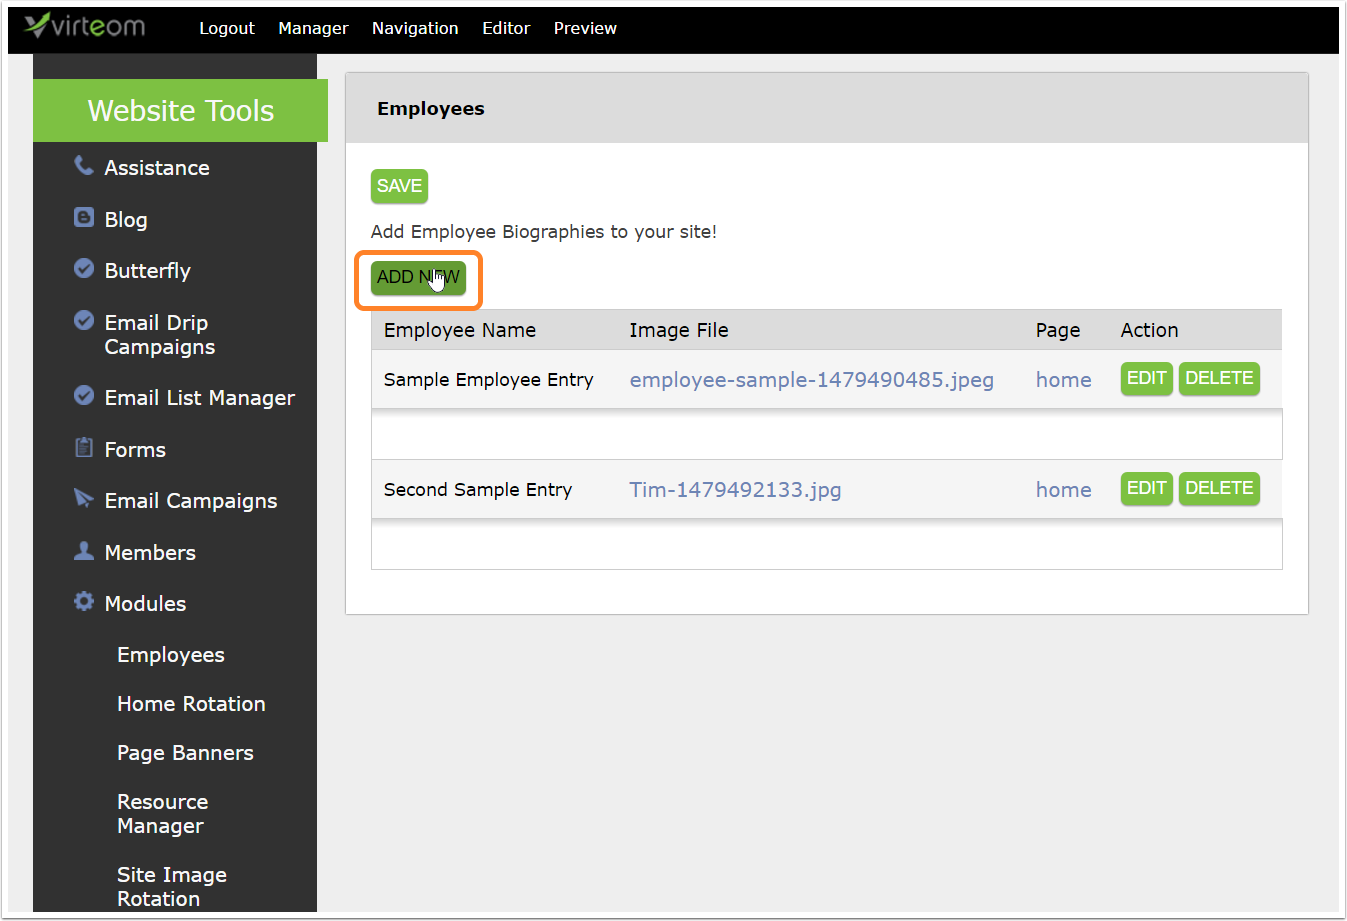
How to add an employee to the Employees Module in Virteom CMS So, you've been wondering "How do I add a team member or an employee to my Virteom powered website?" or "How do I add an employee to the employees module in Virteom?" Well, you've come to the right place. In this article you will learn how to do just that. Follow along with this instructional guide and learn how to add employees to your team's page. As always, if you have any questions - feel free to reach out to a Virteom team member by utilizing our ticket system. Login to the Virteom CMS First and foremost, we'll need you to login to editor side of your website. To access the Virteom CMS, type in yourcompanyurl.com/virteom - Once you're here, you'll use your login credientails. Navigating to the Modules Once you've logged in, click on 'Manager' from the top Navigation. Zoom Navigation > Modules In the right hand Navigation, you'll click on Modules. Once you have accessed the (1) Modules page, you'll see a list of all the modules that are installed on your website. (2) Since we're focusing in on the employees module, we'll click on that one. Zoom Adding a New Employee Now that you're in the Employees module, you can add in a new employee. Click the 'Add New' button. Zoom Entering Information About the New Employee A new screen will appear once you click on the 'New Emp
How to Change Your Page Titles

So you really want to update the name of your page. It's the H1 on the page and it also is in your menu navigation at the top of your site. Well, how the heck are you supposed to achieve that? Do you need to change it in two places? Well, let us show you. It's actually quite easy! Navigate to the page whose title you'd like to update: As an example, this page is named - "Lawn Problem Solver" Virteom CMS: Click on "Editor" edit the page title For Virteom cms: (black toolbar) Pull out the left menu area Click on the little black/white tab thing on the left for rocketsites (gray toolbar): Click on 'Page Settings' that appears in your main editor toolbar: Virteom cms: (black toolbar) Click "Page Information" rocketsites (gray toolbar) click on 'page info' Here are your titles to edit Navigation Title is the title of the navigation - this is what will show up on your menu at the top [where Learn is now, if you're on this page, for instance] This is what appears as the title on your page - which may be styled to output in a banner. For example: The Browser Title is the title of the H1 title and the Icon at the top next to the favicon. And they don't have to be the same [ see below...this customer has two different titles, fancy!] See how this looks virteom cms: (black toolbar) Click "SAVE" underneath Page Layout It is


