Managing Related Page Links on a Virteom Site

Managing Related Page Links on a Virteom Site

How do you manage a menu system in your website that has related hyperlinks to different pages on your website per page? It's a bit harder than just having a menu that is the same on every page in the site. You have to be a bit more inventive in the approach.  Virteom has a module that allows you to select certain hyperlinks that would show up in a menu based on the content on the page you are currently viewing. Let's walk you through that module and how you can use it to manage related content. We'll use Magnet's website to demonstrate the example.  

Looking at the Side Menu

If we look at the side menu we can see it has 5 hyperlinks that go to 5 different pages. The owner of the website wants the flexibility that these would be different per page. On the next slide we'll show you the backend and how you can simply manage this sitewide.

Looking at the side menu

Log Into Virteom

To manage those links on that side menu globally simply log into your Virteom and click on the 'Manager" button on the top menu.

Log Into Virteom

Open the Modules section of your Virteom

On the side menu click on "Modules"

Open the Modules section of your Virteom

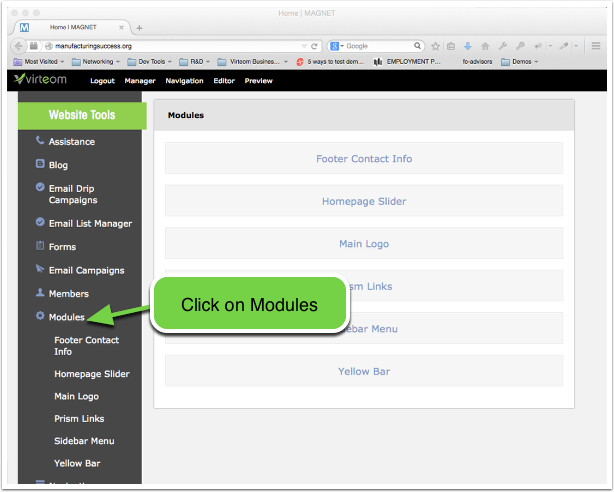
Open the "Sidebar Menu" Module

Open the "Sidebar Menu" module

Managing the "Sidebar Menu" Inventory

In the "Sidebar Menu" module you will see an inventory of links. In this example they match the links on the page we showed you.  You can add a new link by clicking "Add New" or you can edit a link that is already existing. We'll click on the "Edit" button to show you how you can manage the links and what pages they show up on.

Managing the "Sidebar Menu" Inventory

Editing a Menu Link

Once you click to edit a link you will be presented with a screen like this one.  These are the things you can do on this screen:

  1. Select what web pages in your website this link should show up on. By selecting a page this link will show up in that side menu on that page.
  2. If you want the link to show up on every page in the website, simply select all.
  3. You can also control the display order the link will appear in. Keep in mind that the display order wont always be effective if you have two links that have display order '5' selected. One or the other may appear first.
  4. You can then give the link a title
  5. Browse for your icon image.
  6. And then select the page that the link will go to if it is clicked.
  7. Make sure to save.

That's it. Now with a few simple clicks you can control when and where certain links appear on your side menu with one unified and cohesive module.

Editing a Menu Link


Loading Form...
Posted By Dan Carbone in Learning

Related Posts

Email Footers with Dynamic Advertisements, Company Wide

Virteom has the ability to manage all of your employees email footers easily and effectively.  The first thing you will want to do is add each employee as a member of the Virteom system.  Do this by clicking on the 'Manager' option on the top toolbar and then clicking on the 'Members' option on the left toolbar. Every member in the system can have the capability of having their own footer. So this can be an 'Admin' or an 'Employee' as as example.  But it is not limited to those types. Add a Member Now add each employee of your organization as a member to the system. Do this by clicking 'Add New Member' and fill in their information.    Managing Your Email Footers Company Wide Once you are done adding each employee you will notice that there is an Email Footer in the lower right with a button called click here. When you click this button a new window will open up and a generated email footer for that employee will

Nov 25, 2012 Posted By Dan Carbone

How to Add Images to Your Website

One of the easiest ways to add some flare to your website is to add images. But how do you add images to your Virteom website? In this article we'll cover all the bases on just that.  Preparing your image for upload First things first, we'll need you to prepare your image for upload. There are a few things you should do to your image before uploading your image to your website: Make sure your image name does not have any spaces in it. We suggest replacing any spaces in your file name with dashes (-) or underscores (_).  Optimize your image for the web. To keep your website running at top speed, you'll want to optimize your image for web. How do you do this? Use an image optimizer like this one.   Uploading your new Image into Virteom Editor Now that you have prepared your image to be uploaded, you're locked in loaded to upload it to the Virteom CMS.  Go to your website and log into your Virteom editor. Once you are logged in go to

Nov 20, 2012 Posted By Dan Carbone

Virteom Cloud Marketing Overview

So many marketing and web development firms promise you award winning websites. This sounds sexy, but what does it really mean to you? Doesn't this mean that they will be winning the award for a good looking website rather than building you a tool that will effectively grow your business?  We think that's what it means. Virteom is on a Mission Virteom is on a mission to change what we do once we launch websites.  We're so serious about this mission that we've become the back end technology firm for marketing firms from Cleveland to Detroit.These marketing firms put their trust in Virteom that we will effectively help them grow their customers relationships.  How do we do it? Take a look at the quick overview video of our technology and you'll quickly understand that we create what we like to call Marketing Rhythm.  In fact some experts believe we just may be forging a whole new segment with our technology.  Rhythmic Marketing Rhythmic

Nov 13, 2012 Posted By Dan Carbone

Most Recent

How To Set A Social Share Image for a Page

Posted By Alesha Wireman
May 01, 2020 Category: Learning, Modules, How To

One of the newest features found within your Virteom powered website is the ability for you to add a social share image to any and every site page. This means that when any page of your website is shared on a social media platform, the image that accompanies the post is one that you choose. Social share images play a large role in the number of engagements your posts or others' posts linking to your website receive. It can impact a viewer's decision to click the post, view the page to find out more, and can ultimately result in new business for you.   This new feature is important for several reasons. You now have the ability to control the social share image for every page of your website to ensure that it's the best reflection of your company and the content overall. You can set the image so that it follows your brand guidelines and captures your audience's attention, making them want to visit the website page every time! Updating the social share image is the simplest way to guarantee that your website, blog posts, and site pages present beautifully on any social media platform across the board. How to set a social share image Login To Your Site To make edits to your website, you'll need to log-in first:  Login to the back-end of your website by visiting (your URL.com)/virteom Enter your username Enter your password Click 'Login' Navigate to the Page you're Setting A Social

How to Add, Edit and Delete Photos Using the Masonry Module

Posted By Olivia Justice
March 23, 2020 Category: Learning, Modules

Is your Virteom powered website utilizing the Masonry Photo Module? Adding new photos to your gallery is really simple and even allows you to upload multiple images at one time. The one real advantage of using the masonry module is so that you can display images in groupings or categories on a singular webpage. This allows you to separate images out into different galleries so like photos can appear together. For example: Say you're a landscaper and you have a webpage entitled "Hardscapes". You may want to output multiple galleries on this single page to break out each type of hardscape you've done: walkways, patios, pergolas, steps, fire pits, etc. The masonry photo module allows you to accomplish this. You can set multiple categories, and multiple galleries in that one category - all to output on one single webpage. In this how-to article, we explain how to add a new category, add a new gallery, edit an existing category, edit an existing gallery (adding images to an existing gallery), and how to delete categories, galleries, and images in the Masonry Photos module powered by RocketSites. Logging-In First things first, you must log-in to your Virteom powered website. You can do this by visiting your website and adding /virteom at the end. This will take you to the log-in screen for the site. Enter your email address in the email field Enter your password in the password field Click 'Login' Navigate to the Masonry Grid

How to Create Private Pages with Virteom

Posted By Olivia Justice
August 21, 2019 Category: How To

Websites make it easy to get your business information out to the online community, but after building websites for 20+ years, we've learned that sometimes you don't want every page on your website accessible to the general public. Which is why RocketSites offers the ability to create private pages that are only accessible to a designated person/company. Why would you want to use private webpages? Private webpages are used for a number of reasons. Our clients have used private pages for promotions in email campaigns, as a document center, for quote calculators, you name it. Private pages really come in handy! Private pages also allow you to essentially have a draft of the webpage you're creating without it being accessible to the general public. Whatever the use case, Virteom Rocketsites makes it easy to mark a page as 'private' and set permissions for the users you want to have access. In this how-to guide, we'll explain how to create a new page, mark it as private, create a new member, and give access to the user.  Keep reading to learn how to mark pages as private in RocketSites. LOG-IN TO VIRTEOM CMS The first step in adding a new private page to your Virteom powered website is to log-in. Visit your website domain /virteom (Ex: https://yourdomain.com/virteom). Once you hit the log-in page, you'll need to enter your username and password. NAVIGATE TO SITE PAGES Now that you're logged in to the CMS