Posted By Dan Carbone
September 28, 2016
Category: ECommerce
This article will demonstrate how to add multiple pricing options to a product.
Product Attributes
Add a set of attributes first to the attribute area of the cart. This could be something like Colors: black, white, red and so on. It could also be purchase or lease and the options.
Click on "Manager"
Click on "Store"
Click on "Attributes"
Click "Add New Attribute"
Give the Attribute a name and fron facing name
Click "Add Option Value" and then type in the value. Click "Save Attribute" in between adding each one.
Adding Attributes to Products
Now add those Attributes to one or more products.
Go to the Products section
Select your product
Click on "Options" and select the attribute set you just created from the Attributes area.
Put a price into each attribute you want to appear on the product - NOTE: DO NOT USE COMMAS
Click "Save Options"
Product Page now has Options with Attributes in them
Now when you view the product page it will show the attrributes / options that product can
Posted By Dan Carbone
September 19, 2016
Category: General
Overview
Are you having issues seeing your website correctly in Internet Explorer 11? Or are you just curious about how to delete the cache in Internet Explorer 11? If you answered yes to any of these then below are some simple steps you can take to clear the cache in Internet Explorer 11. This should fix any issues you may see with your website. Remember any time that your web developer makes any changes to your website it's a good idea to clear your browser cache before reviewing the website. This will remove any old files that have been loaded from the web server to your computer and will replace them with the new updated files that your web developer added to the webserver, forcing them to re-download to your computer.
Some browsers handle cache better than others. We've found that Internet Explorer can be stickier that most browsers when it comes to updating your cache files. If you are still having issues seeing your website the way you intended you may want to make sure taht your Emulation is set to the default of Internet Explorer 11. This can be found under the "Developer Tools" section.
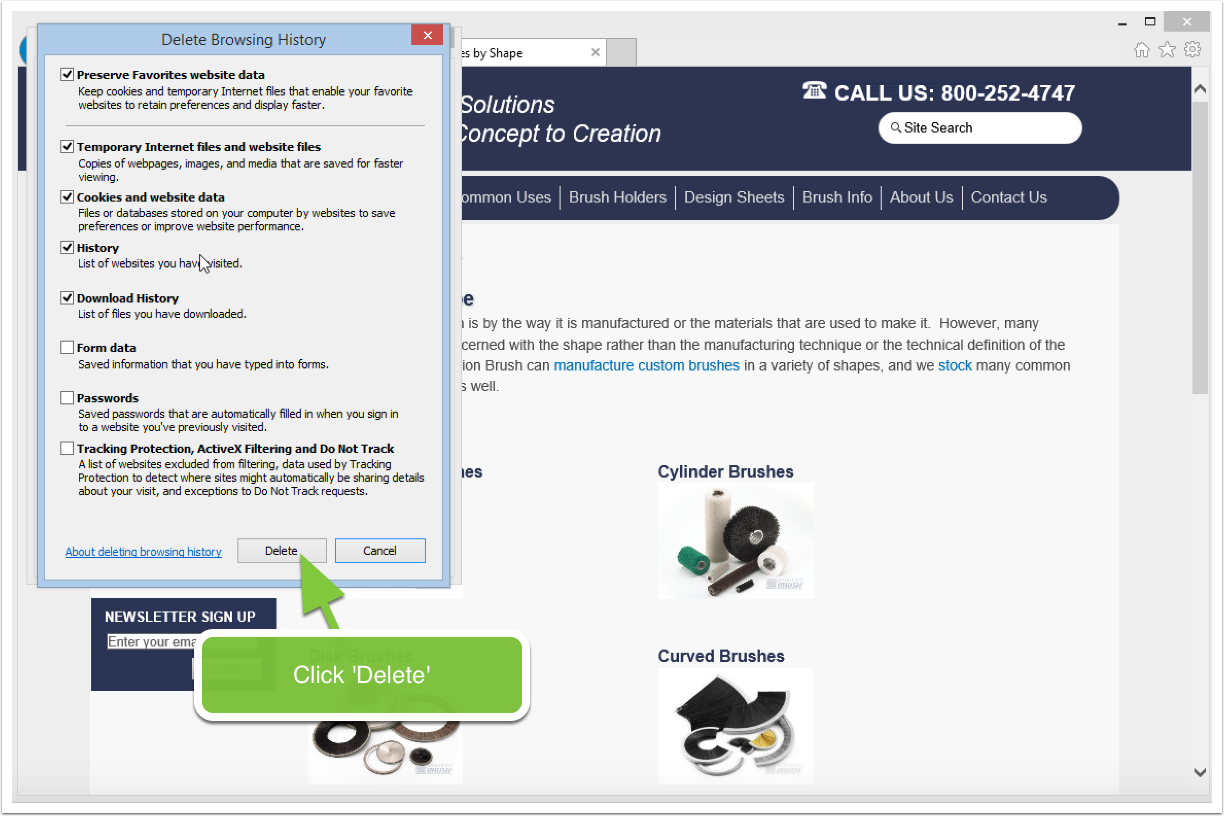
Click on the gear in the upper right corner.
Click on "Internet Options"
Click on "Delete"
Make sure the first two box's are checked off and then click "delete" at the
Posted By Dan Carbone
June 30, 2015
Category: Internet Explorer 11, Cache
Click on the Gear
Click on Internet Options
Click on Delete
Click on Delete
Posted By Dan Carbone
May 08, 2015
Category: Learning, PhotoGallery
Step 1: Create the Gallery Page
First create the gallery page. You may want to start off by staging it in the Hidden section of the Virteom Platform. Click the plus sign next to the 'Hidden' menu node. You can always move the page later by dragging it around.
Give the Page a Name
Give the page a name
Select "Photo Gallery" off the page layout option
Then click save
Now Add Images to that Gallery Page
Click on "Manager" on the top toolbar
Click on "Modules" on the left toolbar
Click on "Photo Galleries" under the modules section
Add New Image
At the top click "Add New" to add a new image
Fill out a Label. This will become the alt tag.
Select the page(s) that the image should show up on. This will only work if the page has a layout of Gallery from the previous step. The benefit here is you could allow an image to show up on multiple gallery pages if you wanted to.
Browse for the large image. This would be the large image that appears if they click on the thumbnail.
Once you have that selected make sure to click 'Upload Now'
See next screen for next steps in the process...
Add New Image Part 2
Continuing down the screen in adding images. Add a thumbnail to the second browse area. This is the smaller image that appears. You can give the photo a description or leave it blank. Then click save.
Now repeat this process of adding images until all the images are in the
Posted By Dan Carbone
February 12, 2015
Category: Learning
If you want to create a Ad landing page in Virteom that can be used to track Google Conversion, Bing Conversions or any other ad conversion, follow these instructions.
1. Login to your Virteom Platform
Click on Navigation
Click on "Navigation" at the top to add your landing page to the site.
Put your Landing Page in the "Hidden" Section
1. Put your landing page int he "Hidden" section of your website.
2. Click the "Plus" sign next to the hidden menu to add a new page to that section.
A Page Creation Dialogue Box Appears
Once you click the "Plus" button a box will appear.
Select that it will be "Content"
Give you page a name
Select the template layout type. If you've hired Virteom to create landing page templates for your site you will see them in the list below. Select the landing page template you want to use
Check of the checkbox that you want to instantly edit the page after you hit "Save"
Then "Save" the page.
Edit your Landing Page
Edit your landing page
Click on "Save Page" in the upper left toolbar
Click on "Navigation" to add the "Thank You" landing page.
Add Thank You Landing Page
Just ad you did with the landing page creation, add a "Thank You" landing page in the hidden section as well.
Add Content to the Thank You Landing Page
Now add the content to your thank you page and click on the "Save P
Posted By Dan Carbone
February 05, 2015
Category: General
This article will explain how to sprinkle downloadable files throughout your website effectively in a way that is manageable.
Step 1: Log In
Click on "Manager" and then "Modules"
Click on "File Share Center" then "New"
Fill in all of the Information:
Put in a title for the file
Put in a brief description for the file
Type a new Category for the file such as "Press Releases"
Check off "Bypass form and download directly" If you don't want them to exchange an email for the download
Select the page the file should be downloaded from
Click on "Save"
Here's What it should Look Like
Note: After you click "Save" the file Uploader will appear so you can upload a file.
Now you should see the File Uploader
After Saving the File Uploader will appear. See below...
Click "Browse File" and then Select the File on your Computer and click "Open"
Click "Upload Now"
Click "Save"
To add a Second File click "New"
Repeat the Process
Note: Notice that there is now an option to select the category off a drop-down if one exists or create a new one. In this case we'll add our second document to the "Press Release" category.
Once you fill everything In Click "Save"
Note: Notice that in this case this second document will appear on two pages instead of one. I have selected that this d
Posted By Dan Carbone
February 04, 2015
Category: General
This page explains how to change the recipients of a form on a Virteom based website.
Step 1: Log In
Step 2: Click on Manager
Step 3: Click on "Forms"
Step 4: Click on "Edit" on the form you want to edit.
Step 5: Click "Show More Options"
Step 6: View "Admin Emails"
Here you will be on the Admins email tab. Make sure that the "Active" tab is selected. This will allow admins to receive the emails. Right below that "Active" box is who will get this particular form. You can add and remove recipients by using a comma separated list.
Customers Emails
The second tab allows you to create an auto responder email that goes to the customer after they hit submit on the form. Style it how you see fit. Make sure it's also marked as "active".
Website Messages
The third tab is the message that appears on the screen after the customer submits the form.
Google Conversions
The fourth tab allows you to paste a Google Conversion in the site for tracking Adwords to
Posted By Dan Carbone
November 04, 2014
Category: Learning
This article will explain how to upload an image into your Virteom powered website.
Login
First login to your website. You should see the Virteom administration toolbar at the top. Then click on the page in your site you want to add the image to.
Make Page Editable
Make the page editable by:
1. Clicking on the "Editor" option on the top toolbar.
2. You should see an editable zone, this will have a dotted outline around it. In here you can add text and images to your website.
Focus your Cursor
Place your cursor inside the editable zone where you want the image to appear.
Click on Add Image Icon
Click on the add image icon. It will look like a little photo of a house and it's next to the flag icon. This will open a new window.
Image Properties Box
After you click the icon this image properties box will show up. Now you need to browse for the image that you want to place on the page. Click the "Browse Server" button to browse for an image.
File Browser
Once you click "Browse Server" the Image File Browser will appear. In here you can either select an image that you previously uploaded or you can upload one from your computer to the site. We are going to show you how to upload one from your computer. Click "Upload File".
Upload a File
After you click "Upload File" a new box will appear. This is the file uploader box. To browse for a file on your computer click the
Posted By Dan Carbone
November 03, 2014
Category: Learning, Statistics
This article shows you how to view the daily clicks of the users on the website. You can also access other statistics from the statistics window.
Login to Virteom
1. Login to Virteom by going to your website and then typing /virteom after the domain name. For example if your website as example.com, to log into virteom you would type example.com/virteom in the browser window.
2. Then type in your username and password.
3. Click "Login"
Click on Statistics
Click on "Manager" at the top and then click on "Statistics" on the side menu.
Click on Daily Leads
Click on "Daily Leads" on the side menu to view the daily clicks of that have taken place that day. To view other statistical data click on the other reports on the side
Posted By Dan Carbone
October 23, 2014
Category: Learning
How do you manage a menu system in your website that has related hyperlinks to different pages on your website per page? It's a bit harder than just having a menu that is the same on every page in the site. You have to be a bit more inventive in the approach. Virteom has a module that allows you to select certain hyperlinks that would show up in a menu based on the content on the page you are currently viewing. Let's walk you through that module and how you can use it to manage related content. We'll use Magnet's website to demonstrate the example.
Looking at the Side Menu
If we look at the side menu we can see it has 5 hyperlinks that go to 5 different pages. The owner of the website wants the flexibility that these would be different per page. On the next slide we'll show you the backend and how you can simply manage this sitewide.
Log Into Virteom
To manage those links on that side menu globally simply log into your Virteom and click on the 'Manager" button on the top menu.
Open the Modules section of your Virteom
On the side menu click on "Modules"
Open the "Sidebar Menu" Module
Managing the "Sidebar Menu" Inventory
In the "Sidebar Menu" module you will see an inventory of links. In this example they match the links on the page we showed you. You can add a new link by clicking "Add New" or you can edit a link that is already
Posted By Dan Carbone
July 25, 2014
Category: GoogleConversions, Learning
Log Into Google Adwords at https://adwords.google.com
Click on "Tools" on the top menu
Assuming you already have your Ad Groups created and your Ads in that group created along with your conversions you would simply click on the "Tools" option on the top menu.
Click on "Conversions"
Select your Conversion
You may have many conversions in this list. Select the one you want to use. In our sample we only have one.
Get the Code
Conversion Tracking
1. Grab the "google_conversion_id" number
2. Grab the "google_converstion_label string
Place that Conversion Number and Label string in this code...
<div style=”display:none;”>
<img height=”1” width=”1” style=”border-style:none;” alt=”” src=”//www.googleadservices.
com/pagead/conversion/974561955/?value=0&label= “DXUQCJX7nAkQo8Xa0AM&guid=ON&script=0”/>
</div>
Then copy the above code to place into the Virteom platform...
Log into Virteom to Place the Code
Log into your Virteom admin. Click on the "Forms" button to prepare code placement.
Select a Form
Select a form from the list of forms on your website to place the conversion code into. Click "Edit" next to the form.
Click "Show More Options"
Click "Google Conversions"
Paste the Code and hit
Posted By Dan Carbone
May 16, 2014
Category: General
Login to Google Webmaster Tools
Search for Google Webmaster Tools in Google
Click on the link and login with the Virteom Gmail account.
Add New Site
If the website is not already in our list, click the "Add A Site" button to add a new site.
Add a Site Name
Verify Ownership
The next step is fairly simple. Click on the Download option to download the html file to your desktop. Don't click on verify just yet, but leave this screen open.
FTP the Verify File
FTP the verify file to the root of the website.
Click Verify
Now that the file is in the root of your website you can click 'Verify' to finish the linking of Webmaster Tools to Google.
Webmaster Tools - Verification successful
You should see a message like this if you were successful.
Hook up Sitemap
Now lets Hook up the Virteom sitemap to Google. This is fairly simple.
Open the "Crawl" option on the menu
Click on "sitemaps"
Add a Sitemap
Click on the "Add Sitemap" button
Add Sitemap
Now simply type 'xmlsitemap.php' in the open window and click 'Submit Sitemap'. This will link the sitemap output to Googles Webmaster Tools.
Sitemap Completed
When you are finished and refresh the Google page you should see something similar to this where Google found all the pages in the sitemap. Now you know the sitemap is broadcasting correctly. If you don't see this then you may want to che
Posted By Dan Carbone
May 16, 2014
Category: WebsiteSetup, GoogleAnalytics
Adding Google Analytics to a Website
Search for Google Analytics in Google and then click on the home page.
Google Analytics Official Website – Web Analytics & Reporting
In the upper right of the screen, Login. You can use the Virteom gmail account to login and add the new client here.
Add a new Analytics Account
To add an Analytics account, click "Admin"
Add Google Analytics
1. Click on the "Account" dropdown.
2. Click "Create New Account"
Add Account Settings
Fill in all of the website information. And then scroll to the bottom of the screen.
Get Tracking ID
At the bottom of the screen get the tracking ID
Accept Googles Terms of Service
Set key_value in DB
In the sync_config table of your new site's database, find the records for "Google Analytics Username" and "Google Analytics Password". Make sure that the "key_value" property is set to "default" for both of these.
Getting the Tracking Code
For Virteom powered websites you DO NOT need the tracking script. All you ned is to copy the large account number that starts with UA-...
Find the Google Analytics View ID
Click the back arrow or "Admin'"in the navigation bar to get back to the Administration screen. Find the third collumn titled "view" and click "view settings" there.
Save the Google Analytics View ID
Now find 'View ID' near the top
Posted By Dan Carbone
March 22, 2014
Category: Learning
Overview
The video below demonstrates in depth, how you can manage your email lists for your Virteom based email campaigns. This video covers the following topics...
Features Described in the Video
Merging Lists - How to take one ore more email lists and merge them together.
Deducting Lists - How to deduct one list from another. For example if you had a 1500 person list as potential registrants for your conference and you had 350 people registered, you could use this tool to deduct the registrants from the non registrants list in a matter of seconds rather than doing this manually.
Create a List - After you've imported many members into the system it may become necessary to create new lists from the combined member population from all of the lists imported over time. This tool will allow you to do that. It will also allow you to add new customers that became your customers through the Virteom shopping cart and so on.
Edit Lists - Gives you the ability to add and remove people from existing lists.
Filter Lists - This feature allows you to use database filters such as first name, last name, email, company, state and zip and then use a keyword search against those filters to create custom lists. This will be useful for larger list populations in the Virteom Platform.
We hope you enjoy this in depth video on how to use the list management tools for email campaigning inside of Virteom.
Tutorial Video on Managing Email Campaign
Posted By Dan Carbone
August 16, 2013
Category: Email Campaigns, Learning
Open Your Email Campaign
1. Select "Manager" on the top toolbar
2. Select "Email Campaigns" from the side bar
3. Click "Edit" on your email campaign to open it
Editing your campaign
Add all the content of the campaign. Where you want to have a person click on a link to download a document simply add some words like "Download Here" as normal text.
Create Download Link
Now highlight the text you want to make a downloadable link.
Use the Link Creation Tool
With the text highlighted click on the link creation tool.
Link Tool Opened
Instead of making a hyperlink to a website you will be making a hyperlink to a document on the server. Click the "Browse Server" button.
File Browser
The file browser will open, either select a file that is already loaded to your file server or upload one by clicking on the "Upload File" button.
Upload File Box
The upload file box will appear. Click on the "Browse File" button to browse your personal computer for the file you want to upload and then upload the file buy selecting it.
Upload the File
Once you've selected the file from your computer, click the "Upload Now" button and the file will start to upload to the server.
File Browser
The new file will be in your file browser. Select the new file by clicking on the checkmark all the way to the right of the file.
Changing the Hyperlink
This is an impor
Posted By Dan Carbone
August 02, 2013
Category: Learning, ECommerce, Photo Management
Below are instructions on managing your shopping cart photos in Virteom's eCommerce platform. You can have up to 9 photos per product. This will allow you to have either one or multiple angles. If you are crafty you can even make it appear that the photos are rotating by adding each consecutive angle in a row.
Edit a Photo or Add a New One
If you see a photo that you need to replace, simple click on the button below it called, edit photo and...
Replace a Photo
Then click on 'Browse File' to look for the new photo and then click 'Upload Now' and it will replace it.
Delete a Photo
If you want to delete a product photo that is currently in that location just click on the delete icon in the lower right.
Other Features of the photo manager
Some other features of the photo manager include viewing the photo, saving the photo and rolling back the photo to a previous
Posted By Dan Carbone
July 24, 2013
Category: ECommerce, Learning, Virteom Platform
If you are not familiar with Virteom's eCommerce capabilities below is a tutorial on how to add a new product, and manage existing products in a Virteom powered site with the eCommerce plugins installed.
This how-to guide is meant to explain how to add a new product, edit an existing product, and delete a product.
First things first, you'll need to log-in to the back end of your Virteom powered website.
LOG-IN TO VIRTEOM CMS
The first step in adding a new private page to your Virteom powered website is to log-in. Visit your website domain /virteom (Ex: https://yourdomain.com/virteom). Once you hit the log-in page, you'll need to enter your username and password.
Navigate to the Store
Once you're logged-in,click 'Dashboard' from the top gray editor menu.
After clicking 'Dashboard' use the left sidebar menu to navigate over to 'Store'.
Click on the Products link
Now that the Store module is opened, to add, edit or delete products you need to navigate to 'Products'.
The product screen is an inventory of all the products in your website.
How to Add a new product or Edit an existing Product
Once you're on the inventory page for products, you'll see a ledger of the products in your Store.
To add a new product, locate the 'Add New Product' button at the top of the page.
To edit a product, locate the inventory item and click 'Edit' next to
Posted By Dan Carbone
November 27, 2012
Category: Modules
Up until now, it's been almost impossible to create email footer messages that you could change at any time without updating every employees footer. Virteom's bright inventors would like to introduce you to their dynamic email footer creation tool. The tool simply allows you to update every employee footer's advertisement message at the same time with one single tool. See example below.
Updating the Email Footer Advertisement is Simple
Just visit the Email Footer Module and modify your message and hit 'Save Advertisement'. That's it! Every employees footer will be updated with the new message.
Sample Email Footer Output
Once you hit 'Save Advertisement' all footers for your company will be updated instantly. No need to ask each employee to update their footers individually. Update as many times as you want as often as you want.
Want to learn more about how you can enhance your email footers? Give Virteom a call and find out how we simplify every aspect of your marketing efforts just like
Posted By Dan Carbone
November 25, 2012
Category: Learning, Modules
Virteom has the ability to manage all of your employees email footers easily and effectively. The first thing you will want to do is add each employee as a member of the Virteom system. Do this by clicking on the 'Manager' option on the top toolbar and then clicking on the 'Members' option on the left toolbar.
Every member in the system can have the capability of having their own footer. So this can be an 'Admin' or an 'Employee' as as example. But it is not limited to those types.
Add a Member
Now add each employee of your organization as a member to the system. Do this by clicking 'Add New Member' and fill in their information.
Managing Your Email Footers Company Wide
Once you are done adding each employee you will notice that there is an Email Footer in the lower right with a button called click here. When you click this button a new window will open up and a generated email footer for that employee will be there. Send each employee this link and have them copy and paste the contents of the page into their email footer of their mail program whether that would be Outlook, Mac Mail, Gmail or others.
Once you click 'Click Here' your browser will pop open a new window. Copy the link from the new window and email that link to that employee and ask them to copy and paste the entire contents of that page to their email footer dialogue in their Outlook, Mac Mail or Gmail
Posted By Dan Carbone
November 20, 2012
Category: Images, Image Upload, On Page Editing
One of the easiest ways to add some flare to your website is to add images. But how do you add images to your Virteom website? In this article we'll cover all the bases on just that.
Preparing your image for upload
First things first, we'll need you to prepare your image for upload. There are a few things you should do to your image before uploading your image to your website:
Make sure your image name does not have any spaces in it. We suggest replacing any spaces in your file name with dashes (-) or underscores (_).
Optimize your image for the web. To keep your website running at top speed, you'll want to optimize your image for web. How do you do this? Use an image optimizer like this one.
Uploading your new Image into Virteom Editor
Now that you have prepared your image to be uploaded, you're locked in loaded to upload it to the Virteom CMS.
Go to your website and log into your Virteom editor.
Once you are logged in go to the page you want to edit and select 'Editor' off the top toolbar.
Put your cursor in the editable area at the spot that you would like the image to appear.
On the Virteom toolbar click on the 'Image Tool'. ()
Once you click that icon a popup will appear. Click 'Browse Server'
On this next step you will want to consider organizing your photos into folders to they do not become a mess over time. So either select a folder you would like to